TIME is running away from me and I’m just hoping I get enough of this done to cobble this post together by the time it’s due! I’m heading back to the homeland for a wee holiday so I’m racing to get the last of my work finished before I fly out (after the mammoth bus journey to Incheon…)
LUCKILY for me, I work best last minute and under pressure. My best essays were always written in the wee hours of the morning as the due date loomed, after weeks of false starts! So here we are with the 3rd post in the Wonderland Camp series, and potentially the last before the camp itself, so anything left out will have to wait until then!
OH the shame!! This is being posted on the first day of camp! Woe is me! Everthing has somewhat run away from me recently and you may have noticed that all sorts of changes are afoot at This Geeky Teacher, but that’s not excuse! There’s all the intent to get some cracking posts up for you guys, the first of which is another in the Wonderland Camp series.
TODAY I’m going to fill you in on day one’s invitation activity, the party hat activity and a few PPT’s and worksheets (I hope!) Like many of my crafts, I printed off the templates and laminated them before cutting them out so they are more durable!
INVITATIONS
I’M going to kick off the camp with a PPT about invitations. I thought it would be fun to introduce them to the world of Debrett’s. After learning bits and bobs about invitations, they’re going to make some themselves.
MATERIALS
- Textured card, one sheet of A4 for 2 students, or get A5 sized card
- Templates: Invitation Templates
- Pencil
- Scissors
- Metalic Pens
- Coloured Pens
- Cursive Cards (if the kids want to use cursive)
- PPT: Invitations
METHOD
I’M old school, so my students will be doing this the long-hand way. Instead of getting the template ready-printed onto card, they will have to draw around their chosen template first. This has a few benefits. Students can’t complain that they haven’t got the one that they want, they will take responsibility of the craft from start to finish and if creates plenty of time for me to chat with students. If you read my Harry Potter camp posts, you’ll remember that this is a big thing for me!
ONE thing to remember, make sure they trace around the template on the back of the piece of card!


ONCE the invitation has been cut out, the students will have free reign to do whatever they like with regards to content and colour, you’ll see there are content suggestions on the PPT, but I’m not going to limit them to anything. I whipped up these two examples:


THE last day of camp we’re going to have a Tea Party, cucumber sandwiches and all, hence the example here!
I’M really looking forward to seeing what all my students come up with!
PARTY HATS
WHILE there is no designated time for these to be made during camp, I always end up with time to be filled. As we’re not watching a movie this year, this is going to take up the time left over. It will hopefully use up any left-over origami from the teacups, or vice-versa!
MATERIALS
- Card – I used 110g weight which was better than my attempt with 180g card. Lighter card is more malleable, so I would recommend it! The card I used was also textured on one side, to make it more interesting. I’ll have a range of colours to choose from!
- Elastic
- Template: Party Hat Template
- Pencil
- Scissors
- Craft Knife
- Ruler
- Sellotape
- Origami paper
- Glue gun
- Hole Punch
METHOD


PARTS of this craft are a little fiddly and just because of low-key paranoia, I won’t be letting my students anywhere near craft knives – even though most of them have one in their pencil cases – they won’t be out in my classroom! Other than that, this is a really simple craft with very pleasing results.
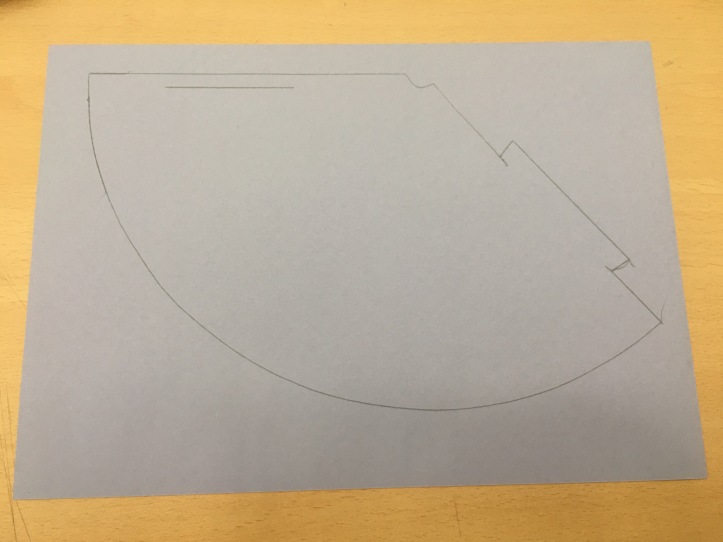
FIRST off, much like the invitations, they’ll be tracing round the hat template. I have cut out the slit so they can easily mark the line, and they need to make sure they mark the notches of the flap well – you can see in the photo below that the lines carry on beyond the edges of the flap. This is deliberate. Again, as with the invitations, make sure they trace onto the back of the card.
ONCE the hat is cut out and constructed, use a wee bit of sellotape to keep everything in place, then you can origami away!
As with the teacups, I’m not limiting my students to flowers – I’m happy for them to make whatever they like!
I stabbed holes in my prototype hat using a pen, but i will be usign a holepunch come camp proper! The lentgth of the elastic was a total guestimation, but that worked out great!

Do let me know if you make these, and tag @thisgeekyteacher over on Instagram if you do! I’d love to see what you come up with!
